
Bags of dry beans on grocery store shelves can be pretty intimidating. Don’t you have to cook them somehow? And don’t they take forever to cook while I stand over the stove? And they’ll never turn out like beans in a can, right?
Guess what? It’s not very difficult at all to get tasty beans from a bag.
I’ve been using the following process for a couple of years now, and it’s pretty hard to mess it up. The process itself is a lot like my cooking stuff – no need to measure things and very forgiving. Plus, the process uses a slow cooker, so you don’t even have to be at home to get great beans!
If you need beans right now, then you’ll need to buy them in a can (they call it a slow cooker for a reason). But if you want to always have a stock of beans in your fridge ready to go at a moment’s notice, this process will work great for you. Let me break it down.
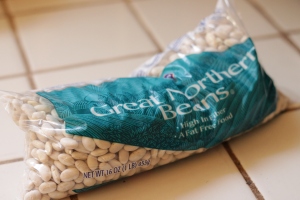
Grab a bag of your favorite beans at the store. Dry beans are much cheaper than beans in a can – a single bag will cost between $1.50 – $2.50, depending on the type of bean. I haven’t noticed much of a difference between the store brand and “name brands”, so you can make it more affordable by choosing the store brand or whatever is on sale. Garbanzo beans (chickpeas) tend to run a little bit higher, in our area, so I only get them when they are discounted. Pinto beans tend to be the cheapest, and I can get a 32 oz bag for about the same cost as a 16 oz bag of black beans. This process will work with any type of dry beans in a bag.

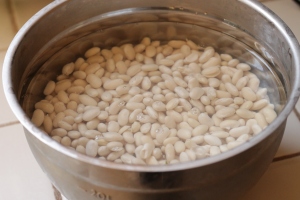
Next, you’ll want to open the bag and pour it into a bowl. If your slow cooker has a removable insert, you can pour the beans right into there. Sometimes in the bean “harvesting” process, little rocks will be picked up along with the beans. This happens with any brand, so don’t think it’s just because you cheaped out and got the store brand. It just happens, and it only takes a few seconds to sift through the beans and look for the stones. In the last few bags I’ve cooked, I haven’t found any. In some bags, I’ve found up to 3 or 4.
Once you’ve sorted the beans, fill your bowl or slow cooker insert with water, enough to cover the beans plus maybe half an inch over. This is the soaking part of the process, and it helps prepare the beans for cooking. Once the beans are covered with water, just slide your bowl or insert into the refrigerator. You’ll let the beans soak for around 8 hours, or overnight. Or longer. Sometimes we’ve gotten busy and the beans have soaked for an extra few hours. No worries.
So you’ve got this bowl of water and beans in your fridge. Once they’ve soaked, you’re ready to cook them. If you’re using the slow cooker insert, you might want to let it sit on the counter for a bit to warm up so you’re not putting cold stoneware right into a hot slow cooker. However, the slow cooker takes a little bit to really get warm, so if you’re in a hurry, pop that insert right into the slow cooker. If your beans are in a bowl, pour them into your slow cooker. Turn the dial to “high” (that’s what it is on my slow cooker, anyway) and let it go. You’ll leave the slow cooker on for about 8 hours, or overnight.
Now, some beans take a little bit longer to cook than others. I’ve found that Great Northern beans tend to cook the quickest, maybe in as little as 6 hours depending on your slow cooker, and garbanzo beans take the longest. Black beans and pinto beans are somewhere in the middle. But the difference is negligible, so just figure your beans will take about 8 hours to cook.

To check if your beans are cooked, take the lid off the slow cooker (watch out for steam!) and poke the beans with a fork. If they’re tender, they’re done. Sometimes cooked beans will float to the surface, or the skins will come off the beans in the cooking process. Garbanzo beans will sometimes have a residue that floats to the top of the water while cooking. This is all totally fine.

Now that your beans are cooked, you’ll need to drain off all that water. Put your strainer or colander in the sink, and pour beans and water right into it. Next, rinse your beans thoroughly. Once the water runs clear, you are ready to put your beans in a container and keep them in the refrigerator.

We use mason jars for just about everything, and this is no exception. They store well, they’re compact, and they last a long time – plus, they’re not plastic. One 16 oz bag of beans makes almost two jars worth. We go through beans pretty quickly in our house, so we know that when we get through the first jar of beans, it’s time to soak another bag of them. If you don’t go through beans so quickly, you can make them keep even longer by storing them in the freezer. To do this, instead of using jars, you’d put the beans in a Ziploc freezer bag, squeeze out the air, and place the bag in the freezer. They could keep for a couple of months. In the refrigerator, they could keep for a week or maybe two.
If you have a bag of beans bigger than 16 oz, you can either cook the whole thing and then store them in the freezer, or you could just cook a portion of the bag. I usually buy pinto beans in a 32 oz bag, but will only prepare half of them at one time. This keeps us from getting burned out on pinto beans, and it helps stretch our dollar a little further.
This process will easily make the amount of beans you’d get in 3 to 6 cans, at a much lower price point and with little effort on your part (other than a little bit of planning ahead). Remember, 16 oz of dry beans does not equal a 16 oz can of beans! A lot of the weight of the can comes from the water that the beans are packed in, that you drain off anyway. You get much more bang for your buck from buying dry beans.
How do you save money while you shop? And have you ever fixed dry beans?


